Family Tree(s)

Family Tree

This was a commission from a long time colleague from Edmonton, celebrating their 20th anniversary and the joining together of families, a mother, daughter, and husband. The central tree is larger to symbolize strength and unity.

My wife Kathleen came up with the idea of three trees twisting together, with conjoined roots.

I carved this in basswood, finished with wood butter from Wagner Hills Market, and is 8 1/2” x 11” x 1” thick.

The tools I used were primarily carving gouges, everything from a number 2 sweep, 15 mm wide, to a number 9 sweep, 1 mm wide. Deciding how to carve the leaves was a head-scratcher for me until I was working on another carving and found the solution. I simply used a number 7 sweep gouge about 6mm wide, and plunged it into the wood on one side before plunging it into the wood on the opposite side and out popped a leaf! Some of them needed a little cleaning up at the bottom so I carved a centre line using a micro v gouge from Flexcut Tools.

Carving a Knot

Carved Knot

Several months ago I saw a black and white photograph posted on Instagram by @jsollows, a local photographer, and it really struck a chord (and a cord) with me. I contacted him about carving it and he agreed that I could.

I started with a 1 inch thick piece of basswood, and cut it to 8.5”x11” square. Then I transferred the image to the wood, and started setting in the depth by cutting around the ropes and carving from the edges to these stop-cuts.

Setting the depth and outline.
Carving the general shape.
Textured rope, smooth background
Softening the edges.

All in all, it was a fun project that I probably completed in about 8 hours of carving time, not including research and, well, time spent pondering my next move. This one is headed to Jim’s place sometime soon.

Title: Knotted Relief

Material: basswood, 8.5”x11”x1”

Finish: wood butter (a blend of natural oil and beeswax.

Carving a (Famous) Lion

Two Bearded Fellows

I was privileged to be able to do a relief carving for the entrance door to the new C.S. Lewis and Friends Collection at Trinity Western University in the Norma Marion Alloway Library. I worked with the Librarian who confirmed with the donor that this project was approved. Throughout the process my drawings and clay maquette were reviewed and the theme emerged as I worked first on paper, then in clay, and finally in wood.

Pottery Clay (can you see a lion in there?)
The new collection is in this room.
I struggled with the mane

I tried numerous ways of designing the mane. I tried extruding hair using my wife’s potato ricer. It kinda worked but then I realized there was no good way to carve that. Then we went to Europe, specifically London, Paris, and multiple cities in Italy. We visited the National Gallery in London, the Louvre in Paris, and many galleries in Italy, including the Vatican in Rome and the Iffizi Gallery in Florence. I paid a lot of attention to how the ancient sculptors carved lions and manes and hair in general. I came back and tried this:

Clay Mane

It was still a little flat for my liking and too busy with all the little lines carved into each clump of hair.

A lion emerges
The mane and unfinished eyes

If you haven’t guessed yet, this lion is supposed to be Aslan. Carving such a famous character from literature and the allegorical figure he portrays in The Lion, the Witch, and the Wardrobe, was a bit terrifying for me. The famous description of Aslan by Mr. Beaver kept running through my mind as I carved this: “Safe?” said Mr. Beaver … “Who said anything about safe? ‘Course he isn’t safe. But he is good. He’s the King, I tell you.” Trying to achieve something of this in a piece of wood may be the hardest thing I have ever done to date.

Aslan, 13”x16”x 2 1/2” carved in basswood.

How To Carve Quickly

Dogwood flower carving in progress

People are often surprised at how quickly I can carve something. As I was finishing up teaching an introductory carving class on how to carve a dogwood flower in relief that took approximately 4 hours for the students, i demonstrated that I could carve the same flower in less than 10 minutes. I did so for three reasons.

Reason one: I demonstrated how to carve fast because some students were very tentative and unsure about how to get the shapes they wanted and as a result they nibbled away at the wood, tiny slivers at a time. This is normal and common among anyone trying something for the first time. Especially so when an expert is nearby, presumably evaluating them and their abilities with a critical eye. They do not want to make a mistake. My demonstration was partly intended to show how them that when you have practice and a clear idea of the shapes you want, you can really speed things up by carving the low spots away aggressively. But the risk in this is that carvers can carve messily – tearing wood and gouging too far into another piece you want to keep. This works against the goal of carving a beautiful piece that is crisp and clean, and does not speed things up because the carver has to recover from the mess, making adjustments to the original design and having to go over the sculpture again with a few cleaning cuts with knife and gouge. I have found that a few cleaning cuts often stretch into many cleaning cuts….

Acanthus leaf carving in progress

Reason two: I demonstrated how to carve more quickly because some students, in their nervousness about taking things too far, didn’t take them far enough. This is also normal. These students know the dangers of cutting off a piece they want to keep. However, my experience is that nibbling away at a carving often works against getting more bold curves and dramatic curves, and students end up with a rather blah carving that doesn’t really grab attention. Shadows are muted, and the drama falls flat. The beginning carver is often dissatisfied with this and must either give up or go back and recarve the piece, which takes much more time. Carving deep early on, focusing on the sculptural shape first, solves this problem.

Fruit bowl relief carving in progress

Reason three: I showed students the value of carving quickly because it can help maintain the overall vision of the piece. Some students get so focused on each individual cut they miss the forest for the trees. By this I mean they lose the overall shape of the sculpture because they are so attentive to the current cut. This is akin to the carver who starts by carving a feather on a block rather than first cutting out the entire shape of the duck. It can be done but not fast, because every feather cut must adjust the overall shape of the sculpture and this is very inefficient. The principle of first cutting out the shape of the duck on a bandsaw applies to using gouges and knives. Focus on the overall shape before attending to the details and you can speed things up because you will know exactly where those details should go – where to start and stop your cuts, lines, and curves. As a result you limit the need to go back over the carving and redo various parts. Carving fast, focusing on the overall shape first, speeds up the sculpting.

Loon sculpture

I showed the students how I can carve fast because many of them were nervous. I understand that. It took me years to get over my fear of ruining a piece of wood, and I didn’t have anyone to show me. It was only after watching videos by Chris Pye that I learned about setting the sculptural shape quickly and early before worrying about the details. Sometimes watching someone do it is just what is needed.

A seal on an eroding beach

Unique Cherry Plate

I have carved a few of these bread plates over the years. I thought about numbering them, but that’s normally reserved for copies, such as prints of a painting, where the artist makes a limited number available. These are not like that. These bread plates are all unique for two reasons.

The first reason they are unique is because each piece of wood is 100% unique. Like snowflakes, no two pieces of wood are the same. The wood grows in different locations, different climates, and even in different years, depending on when the wood was harvested. The grain and colour of the wood depend on the species, the weather, the wind, soil, bugs, and all kinds of factors.

The second reason they are unique is because I carve each one by hand. I use a template for drawing the letters but each time I cut a letter I make choices about which tool is required. I make that choice based on the shape of the letter (a curved letter requires a curved gouge). But I also choose a tool based on the type of wood and what the grain is doing where the letter is situated. Consequently, each plate is a mixture of unique wood and hundreds of individual decisions on my part.

My client has requested two plates, and when I carve the second one, they will be close to the same size and shape. But like snowflakes or two original paintings of the same subject, a close look will show all the unique cuts from my gouges, which are like the brush strokes of a painter.

If you order one of these, you will receive an original, that’s for certain!

Carving Memorials

Memorial

I had the privilege of being asked to carve two memorials by the parent of one of two women who passed away. It was an honour to be asked to be part of their stories.

The two women are connected because of the similarities of their situations, and the two families got connected through their shared sorrow. I will not retell the stories because you can read about them in the news. But the two women went missing around the same time and both were found months later, after they passed away.

Tulip memorial for Trina Hunt

Both sculptures are done in yellow cedar and black walnut. Trina Hunt liked tulips, and Shaelene Bell liked butterflies. I chose to design them as though they are in Gothic windows. Gothic cathedrals are known for their use of light through arched windows, and I wanted these memorials to hint at light, even during the dark experiences. Hopefully the two families are brought closer together through these sculptures, and the fact that their daughters can be remembered this way.

“In loving memory…”
“… of Shaelene Bell”

I carved Shaelene Bell’s butterfly in relief, and added some colour using my Razortip pyrography pen. The antennae are steel and epoxy. The lettering on both sculptures is hand carved. The letters around the rim of the butterfly were very challenging to cut especially in the end grain at the top of the window. Both sculptures are finished with several coats of oil and beeswax, and burnished to a soft glow. TV

Carved Growth Chart

Last year some friends from Saskatchewan brought us a board from our old house on which we had marked down our children’s heights as they grew. We had to leave it behind when we moved because it was part of the house. But when the new owners renovated, they took it out and our friends were able to get it and drove it out to us on a visit. The memories!

We do not have this many children!

That inspired an idea to carve a growth chart for our grandchildren. I decided to keep it simple so that there would be lots of room for names. I chose a 6” wide maple board. Because our family is fairly tall (both of my sons are over 6 feet) I made the board 7 feet long.

The tools I used

I marked it every half inch, every inch and every foot. The half inch marks are half inch in length. The one inch marks are one inch long and the one foot marks are two inches long.

As you can see, I also carved the family name. I did not paint or varnish the board so that it would be easier to write on it.

If you want one like this for your family, please contact me by email at gvmcmillan@gmail.com Because wood prices are so volatile right now I can’t set a standard price, but we can make arrangements in advance so that you can order with confidence.

Trying Something New

I often approach carving very cautiously, but recently decided to be more bold. I think I’ve been cautious because I approach carving from a position of scarcity: “there is only one piece of wood like this in the whole world and I could ruin it! Ergo, go slow, Grant. Be careful.”

What does it mean to approach a carving more boldly? Take this carving of dogwood flowers.

Dogwood Flowers (safe version)

I intend that it will start low to the table on one end and rise in the middle before dropping back down at the other end, somewhat like my powerful looking biceps muscles (smirk!). So I started carefully by drawing the flowers and branch on the wood and cutting out the shape on the band saw. The first thing I started carving was the centers of the flowers, followed by the petals of each flower with the intent that I would gradually sculpt down from the surface, lowering each flower centre and each petal until I felt the flowers were at the right height. You can see in the photo that I started carving  all the flowers at the same height, that I separated the petals and had begun to lower them slightly. Not too much at a time because, hello scarcity! This is how I carved the last dogwood carving, and it was very safe. But it took me longer to carve than it takes Canada Revenue Agency to complete my tax refund, and I thought there must be a better way! Which is also how I think about paying taxes.

I have long been a fan and subscriber to Chris Pye’s carving training videos, and noticed that he confidently and aggressively removes waste wood before he starts carving details. So I thought I would give it a try. In less than an hour, I had the first flower and stem at the correct depth and roughly carved. All that is left to do is to smooth the petals, undercut the flower to throw a good shadow, and stamp the centre (stamen), which will take another half hour of time.

Dogwood Flowers (bold version)

In short, I’m happy with this new way of thinking and I am happy with the the process and the outcome. As I always say, “Go bold or go home!”

Ok, maybe this is the first time I’ve said that – it must be my bold coffee speaking. Bring on the boldness, in coffee and in carving!

Passion and Patience

This post was inspired by two others: Nancy Hillier and Rick B, who posted a quote from Maya Angelou that grabbed me.

Seek patience and passion in equal amounts.
Patience alone will not build the temple.
Passion alone will destroy its walls.

– Maya Angelou

Below is an example of how I apply this to my carving. I’ve been “working” on this relief carving of a fireman’s helmet for several years. In fact, I started working on it before I even knew what it looked like because the person who commissioned the carving hadn’t provided me with a photo or a concept – just a “Hey Grant, one day I’d like you to carve my fireman helmet.”

This is an in-progress photo of me carving a fireman helmet in relief.
Fireman Helmet Relief Carving In Progress

I was itching to get started, but I have started and ruined many a carving by, to use a track & field image, jumping the gun. I’ve learned to be patient, and in this case, rolling the helmet idea around and around in my head for several years before the client said, “Go!” It’s a good thing, too, because it turns out he was hesitating and I was hesitating because we both thought it meant carving a full-size, in-the-round, 3-D, helmet, and neither of us really wanted that. With due patience and thought, other ideas came to my mind and with them, a measure of relief (see what I did there?).

Once that was settled, the passion could take over!

Restoring Two Antique Carved Tables

A few months ago, a long term client asked me to restore two antique side-tables for him. These two tables were originally made for his father in the Congo sometime in 1930.

The tables had suffered from moving to three different continents, and the results of changes in humidity and some dodgy repairs attempts. The top of one was seriously warped and needed a lot of careful work with a hand plane. It was made of one solid piece of rosewood, and I couldn’t risk running it through a thickness planer for fear it would break in half.

This was followed by working both sides over with a card scraper.

Perhaps the most difficult part was fitting the feet of the legs with thick sheets of copper, drilled and screwed into place. The difficulty was because everything about these tables was hand made with no two pieces exactly the same. On top of that, the legs were badly warped and twisted. So each sheet of copper had to be individually fitted into the feet. This meant that I had to clamp the legs together, make individual cardboard templates for each foot, cut these out of the copper sheets, and then inset them into the feet. One I had the copper feet properly fitted, I clamped them into the legs and marked them for drilling. Many hours were spent at my drill press first drilling the correct holes and then drilling matching pilot holes for the screws in the legs.

At this point, no carving was done, but don’t worry, that’s still coming.

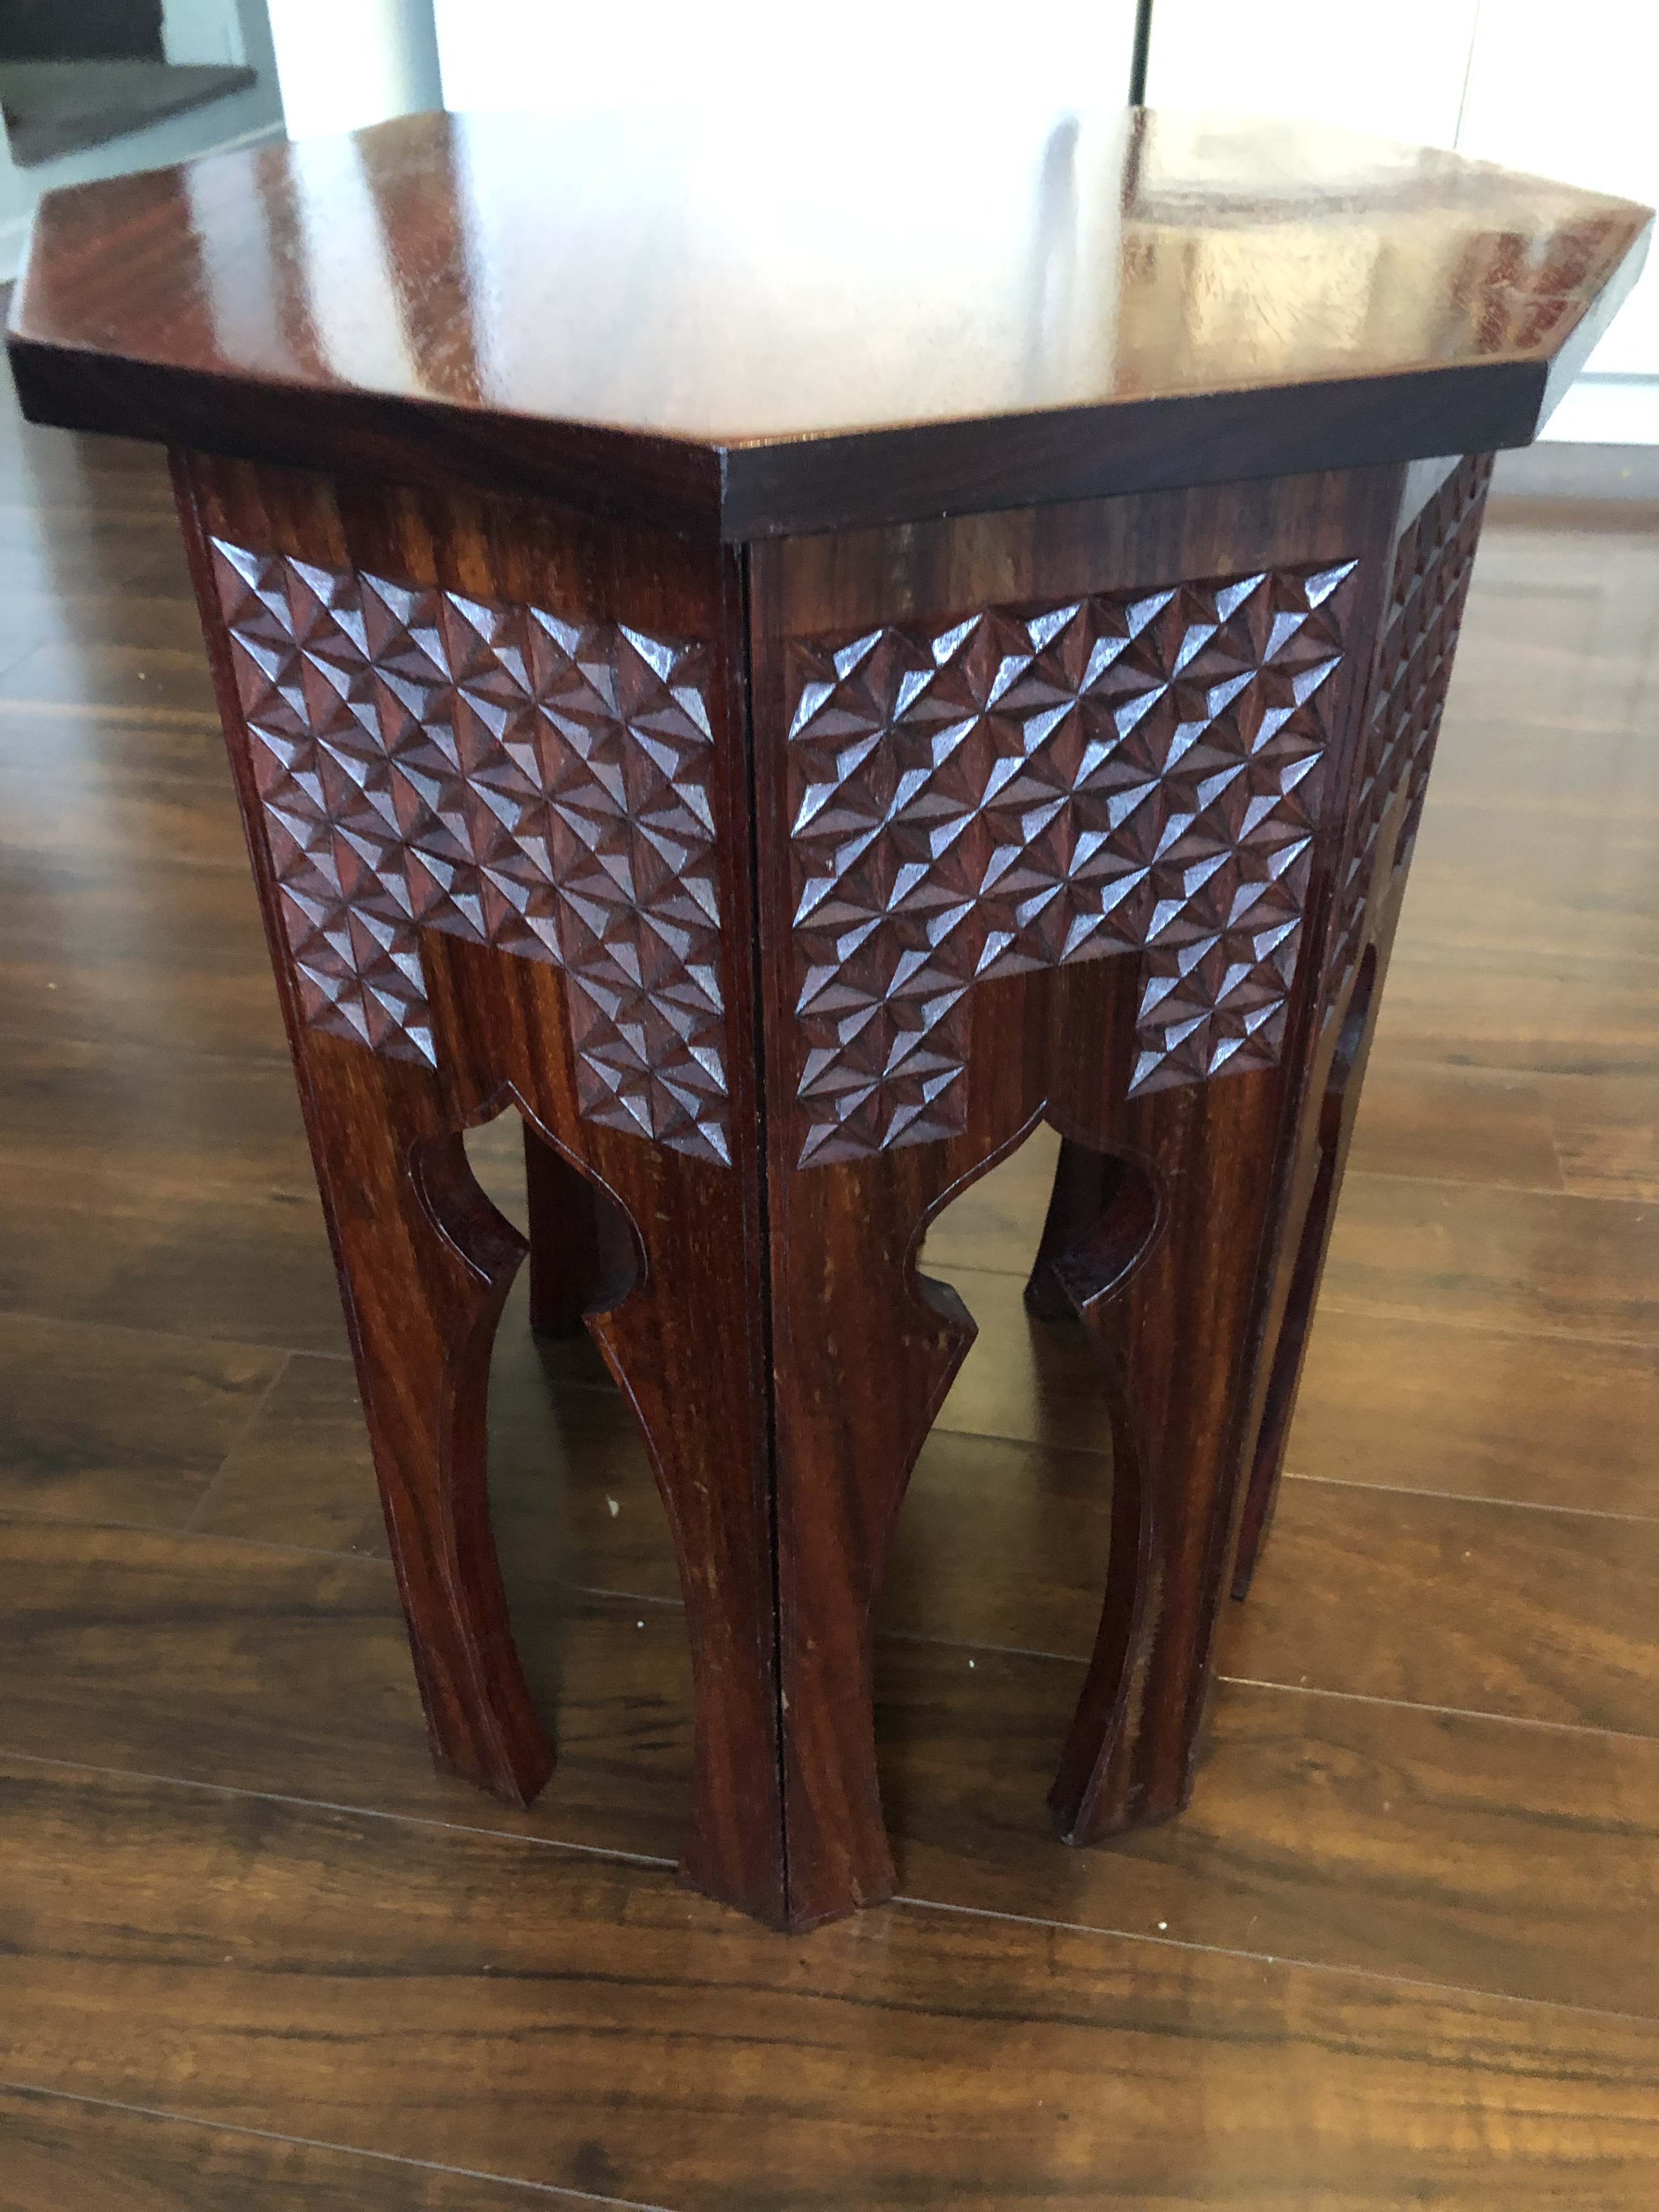
Next, the owner asked me to make the two tables match a little better. One table had nice arabesque cutouts in the legs. The other table had solid legs. So I made a template for the cutout, bought a new blade for my bandsaw and with a lump in my throat, I started cutting into the solid rosewood legs.

After a quick clean up to remove the saw marks, it was time to restore the carved elements. I pulled out my chip carving knife and went at the repetitive work of skim-cutting surfaces of the diamond facets on the legs. On the legs that I cut the arabesque shapes out, I used a scratch stock to etch a line around the shape, matching the other table legs.

Once this was done, I took the card scraper to the legs, touching the tops and legs with 400 grit sandpaper afterwards to soften the edges a little.

now to what type of finish to use! The client really didn’t want the carved diamonds to fill with lacquer or varnish thereby muting the crisp cuts. So I chose Tung Oil which would soak in and form a very thin layer, yet still have the soft sheen of the rest of the woodwork in his estate home. This was a labour intensive choice as it turns out. I ended up putting on 6 coats, which were hand rubbed with cotton cloths, and then, 24 hours later were buffed by hand before the next coat of oil was applied. After a week of drying and curing it was time to put the tables together.

The delivery of both tables ended with a surprise. The client has a book stand from the same place and era that he wanted restored in a similar fashion. I went home with another job!

Woodcarvers need to be creative and in some cases, we need to have technical woodworking skills too. I am thankful for men like my father and his good friend Ivor Monahan, and my shop teachers years ago for the good training and showing me that every problem has a solution. This project had more than its share of problems, but with time and resources, I was able to make it work out!

Mostly I am thankful for a client who trusts me with his antique heirlooms.

Grant McMillan