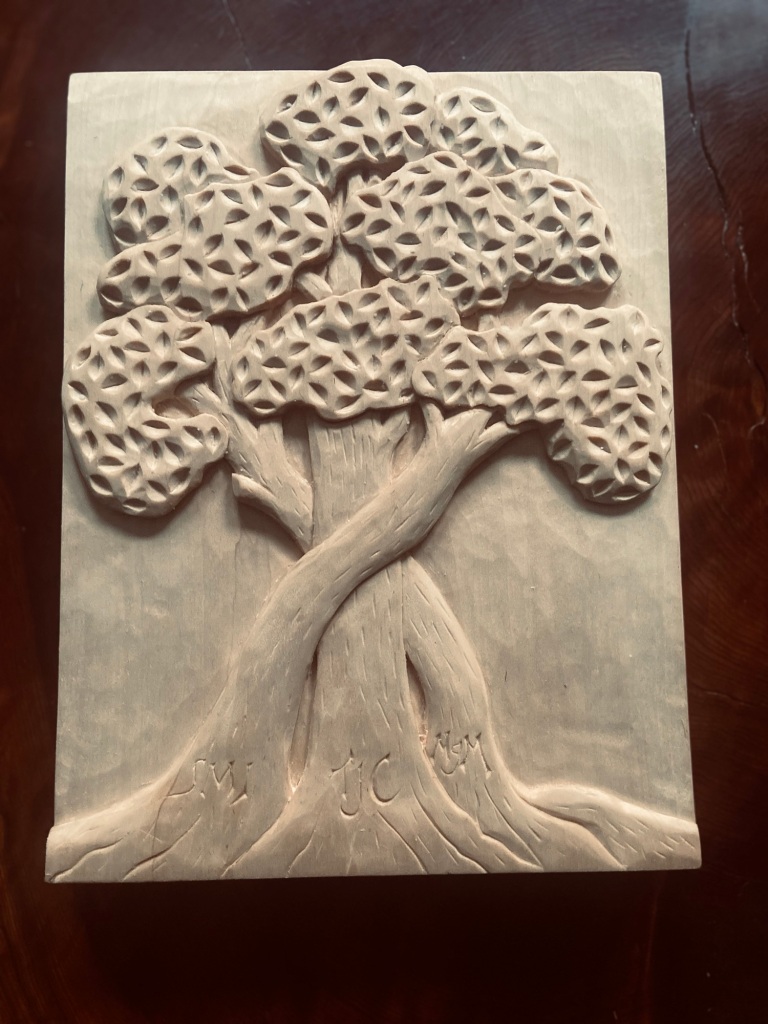
This was a commission from a long time colleague from Edmonton, celebrating their 20th anniversary and the joining together of families, a mother, daughter, and husband. The central tree is larger to symbolize strength and unity.
My wife Kathleen came up with the idea of three trees twisting together, with conjoined roots.
I carved this in basswood, finished with wood butter from Wagner Hills Market, and is 8 1/2” x 11” x 1” thick.
The tools I used were primarily carving gouges, everything from a number 2 sweep, 15 mm wide, to a number 9 sweep, 1 mm wide. Deciding how to carve the leaves was a head-scratcher for me until I was working on another carving and found the solution. I simply used a number 7 sweep gouge about 6mm wide, and plunged it into the wood on one side before plunging it into the wood on the opposite side and out popped a leaf! Some of them needed a little cleaning up at the bottom so I carved a centre line using a micro v gouge from Flexcut Tools.
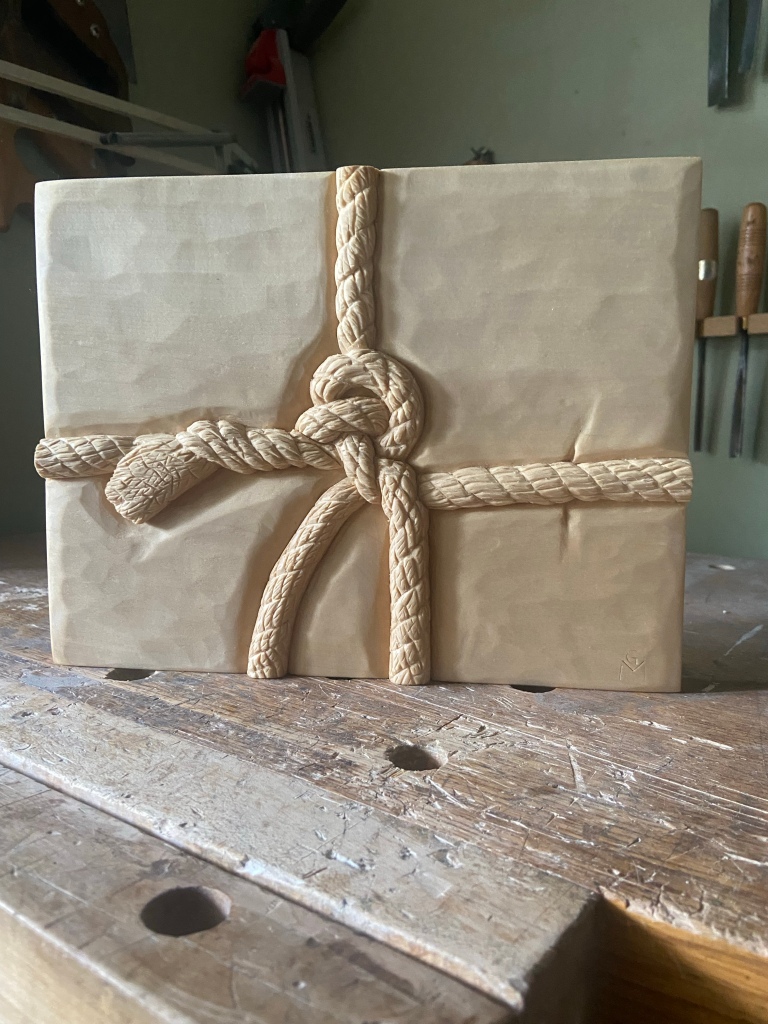
Several months ago I saw a black and white photograph posted on Instagram by @jsollows, a local photographer, and it really struck a chord (and a cord) with me. I contacted him about carving it and he agreed that I could.
I started with a 1 inch thick piece of basswood, and cut it to 8.5”x11” square. Then I transferred the image to the wood, and started setting in the depth by cutting around the ropes and carving from the edges to these stop-cuts.
Setting the depth and outline.Carving the general shape.Textured rope, smooth background Softening the edges.
All in all, it was a fun project that I probably completed in about 8 hours of carving time, not including research and, well, time spent pondering my next move. This one is headed to Jim’s place sometime soon.
Title: Knotted Relief
Material: basswood, 8.5”x11”x1”
Finish: wood butter (a blend of natural oil and beeswax.
I was privileged to be able to do a relief carving for the entrance door to the new C.S. Lewis and Friends Collection at Trinity Western University in the Norma Marion Alloway Library. I worked with the Librarian who confirmed with the donor that this project was approved. Throughout the process my drawings and clay maquette were reviewed and the theme emerged as I worked first on paper, then in clay, and finally in wood.
Pottery Clay (can you see a lion in there?)The new collection is in this room. I struggled with the mane
I tried numerous ways of designing the mane. I tried extruding hair using my wife’s potato ricer. It kinda worked but then I realized there was no good way to carve that. Then we went to Europe, specifically London, Paris, and multiple cities in Italy. We visited the National Gallery in London, the Louvre in Paris, and many galleries in Italy, including the Vatican in Rome and the Iffizi Gallery in Florence. I paid a lot of attention to how the ancient sculptors carved lions and manes and hair in general. I came back and tried this:
Clay Mane
It was still a little flat for my liking and too busy with all the little lines carved into each clump of hair.
A lion emerges The mane and unfinished eyes
If you haven’t guessed yet, this lion is supposed to be Aslan. Carving such a famous character from literature and the allegorical figure he portrays in The Lion, the Witch, and the Wardrobe, was a bit terrifying for me. The famous description of Aslan by Mr. Beaver kept running through my mind as I carved this: “Safe?” said Mr. Beaver … “Who said anything about safe? ‘Course he isn’t safe. But he is good. He’s the King, I tell you.” Trying to achieve something of this in a piece of wood may be the hardest thing I have ever done to date.
People are often surprised at how quickly I can carve something. As I was finishing up teaching an introductory carving class on how to carve a dogwood flower in relief that took approximately 4 hours for the students, i demonstrated that I could carve the same flower in less than 10 minutes. I did so for three reasons.
Reason one: I demonstrated how to carve fast because some students were very tentative and unsure about how to get the shapes they wanted and as a result they nibbled away at the wood, tiny slivers at a time. This is normal and common among anyone trying something for the first time. Especially so when an expert is nearby, presumably evaluating them and their abilities with a critical eye. They do not want to make a mistake. My demonstration was partly intended to show how them that when you have practice and a clear idea of the shapes you want, you can really speed things up by carving the low spots away aggressively. But the risk in this is that carvers can carve messily – tearing wood and gouging too far into another piece you want to keep. This works against the goal of carving a beautiful piece that is crisp and clean, and does not speed things up because the carver has to recover from the mess, making adjustments to the original design and having to go over the sculpture again with a few cleaning cuts with knife and gouge. I have found that a few cleaning cuts often stretch into many cleaning cuts….
Acanthus leaf carving in progress
Reason two: I demonstrated how to carve more quickly because some students, in their nervousness about taking things too far, didn’t take them far enough. This is also normal. These students know the dangers of cutting off a piece they want to keep. However, my experience is that nibbling away at a carving often works against getting more bold curves and dramatic curves, and students end up with a rather blah carving that doesn’t really grab attention. Shadows are muted, and the drama falls flat. The beginning carver is often dissatisfied with this and must either give up or go back and recarve the piece, which takes much more time. Carving deep early on, focusing on the sculptural shape first, solves this problem.
Fruit bowl relief carving in progress
Reason three: I showed students the value of carving quickly because it can help maintain the overall vision of the piece. Some students get so focused on each individual cut they miss the forest for the trees. By this I mean they lose the overall shape of the sculpture because they are so attentive to the current cut. This is akin to the carver who starts by carving a feather on a block rather than first cutting out the entire shape of the duck. It can be done but not fast, because every feather cut must adjust the overall shape of the sculpture and this is very inefficient. The principle of first cutting out the shape of the duck on a bandsaw applies to using gouges and knives. Focus on the overall shape before attending to the details and you can speed things up because you will know exactly where those details should go – where to start and stop your cuts, lines, and curves. As a result you limit the need to go back over the carving and redo various parts. Carving fast, focusing on the overall shape first, speeds up the sculpting.
Loon sculpture
I showed the students how I can carve fast because many of them were nervous. I understand that. It took me years to get over my fear of ruining a piece of wood, and I didn’t have anyone to show me. It was only after watching videos by Chris Pye that I learned about setting the sculptural shape quickly and early before worrying about the details. Sometimes watching someone do it is just what is needed.
Sometimes I get asked to make some pretty cool things. This one has a story I thought you might enjoy.
I was approached by a lady who said she loved my carving art and sculptures, and asked if I could make a wedding gift out of two pieces of wood she had. I asked her for a photo and some more info about the wood.
She explained that this wood came from a large willow tree that grew on their property. A branch had fallen and she asked the guys cleaning it up for a couple of pieces for herself.
Two Pieces of Willow to become one.
Then she told me this wedding gift was for her daughter who had grown up climbing this tree, and would be getting married under it!
I thought this was a great story and one I could work with. I had to flatten the two pieces, and try to get them to the same thickness. They were cut quite different so it was a challenge and I had to work at it for some time. Then I played around with several design options.
A heart seems appropriate for a wedding, and these two pieces of wood are different enough to symbolize the union of two people into a partnership. So considered how to personalize this.
Personalizing in progress.
I like to use tracing paper to work on designs in wood because I can see enough of the wood through it to adjust the design to fit the space and avoid difficult grain or parts of the wood that might distract from the design. In this case there were some worm holes and a knot that I wanted to avoid. My friend and fellow carver Tim Babiuk has encouraged me view these things as features rather than flaws, so I tried to keep them visible. After drawing the letters and tracing them onto the wood, I got the gouges out and started carving.
Once I carved the lettering design into the surface with my carving gouges and knife, I sanded the surface with 600 grit sandpaper before finishing it with multiple coats of oil and beeswax. Then I contacted the client so she could arrange for payment and pickup of this piece. I really like it because it is totally unique and has family history incorporated into the whole piece. I feel privileged to be invited to do things like this for people who appreciate this kind of art.
If you are interested in having me make some art for you, please contact me by email or social media.
I have carved a few of these bread plates over the years. I thought about numbering them, but that’s normally reserved for copies, such as prints of a painting, where the artist makes a limited number available. These are not like that. These bread plates are all unique for two reasons.
The first reason they are unique is because each piece of wood is 100% unique. Like snowflakes, no two pieces of wood are the same. The wood grows in different locations, different climates, and even in different years, depending on when the wood was harvested. The grain and colour of the wood depend on the species, the weather, the wind, soil, bugs, and all kinds of factors.
The second reason they are unique is because I carve each one by hand. I use a template for drawing the letters but each time I cut a letter I make choices about which tool is required. I make that choice based on the shape of the letter (a curved letter requires a curved gouge). But I also choose a tool based on the type of wood and what the grain is doing where the letter is situated. Consequently, each plate is a mixture of unique wood and hundreds of individual decisions on my part.
My client has requested two plates, and when I carve the second one, they will be close to the same size and shape. But like snowflakes or two original paintings of the same subject, a close look will show all the unique cuts from my gouges, which are like the brush strokes of a painter.
If you order one of these, you will receive an original, that’s for certain!
I was recently contacted by a former colleague and long time friend who asked me to carve a cane for her mother. My wife and I visited Nova Scotia and stayed with them for a few days some years ago. My friend’s mom taught us how to prepare a lobster dinner, and she ate parts I could barely look at (ick!). This was a plucky woman!
Carving a wild rose in walnut
Her daughters all got together to commission this cane, and I had a great time carving it. I asked a few questions such as what her favourite flowers are. It was a choice between roses and sweet peas. Sweet pea flowers don’t look like much without colour, and roses are quite identifiable. The handle needed to be special for this feisty woman, and so I carved it in a shape that is suggestive of a bird with attitude. it must be hard to admit you need a cane, so I think it is easier when the cane is not a clunky chunk from the drugstore, but has some class and is an artistic piece that personally represents the user.
They get lots of snow and ice in Nova Scotia so I wanted a tip that was non-slip. I tried to get one from Lee Valley Tools, but they were on back order for months, so I found another option with a carbide ice tip and an even better rubber tip combination from Mountain Equipment Co-op. I had a small challenge drilling into the end grain of the cane shaft to epoxy the tip into the end and keep everything straight and clean. It worked out quite well.
Carbide tip and rubber tip
The finish is a blend of linseed oil, marine spar varnish, and mineral spirits. Three coats gave it a nice low sheen, and the walnut wood looks warm and inviting to the hand. I also used a thin coat of beeswax and lemon oil on the handle just to make it irresistible (grin).
While I was carving the handle, I was concerned about the way the change of grain direction would look at the join to the shaft. So I spent a few weeks trying to locate some brass to use as a spacer that would be decorative. I have a great neighbour named Mario who used to work in a shipyard on repairing propellers, many of which are brass. Mario had some brass for me – a nice heavy, thick, and high quality bit of brass that polished up beautifully. And another buddy (Pat) is a machinist who answered a few questions for me too.
Brass spacer and handle
All in all this was a pleasure to make. I hope it will be even more pleasurable to use.
I had the privilege of being asked to carve two memorials by the parent of one of two women who passed away. It was an honour to be asked to be part of their stories.
The two women are connected because of the similarities of their situations, and the two families got connected through their shared sorrow. I will not retell the stories because you can read about them in the news. But the two women went missing around the same time and both were found months later, after they passed away.
Tulip memorial for Trina Hunt
Both sculptures are done in yellow cedar and black walnut. Trina Hunt liked tulips, and Shaelene Bell liked butterflies. I chose to design them as though they are in Gothic windows. Gothic cathedrals are known for their use of light through arched windows, and I wanted these memorials to hint at light, even during the dark experiences. Hopefully the two families are brought closer together through these sculptures, and the fact that their daughters can be remembered this way.
“In loving memory…”“… of Shaelene Bell”
I carved Shaelene Bell’s butterfly in relief, and added some colour using my Razortip pyrography pen. The antennae are steel and epoxy. The lettering on both sculptures is hand carved. The letters around the rim of the butterfly were very challenging to cut especially in the end grain at the top of the window. Both sculptures are finished with several coats of oil and beeswax, and burnished to a soft glow. TV
I just finished sculpting this snail and set it on a swing under our deck. We like to garden and the most consistent critters helping themselves to our herbs and vegetables are slugs and snails. I like garden art, and a snail seemed to be a natural choice.
Holes for eyes/tentacles Snail
This snail is sculpted from a solid block of yellow cedar with birch eyes inserted. It is finished with several coats of UV resistant spar varnish. It’s not perfect: a knot popped out of the shell and I glued it back in. A lot of snails have pretty rough looking shells, so I think it looks about right.
It’s available for $175.00 (Canadian) plus shipping if required. Email me at gvmcmillan@gmail.com
Last year some friends from Saskatchewan brought us a board from our old house on which we had marked down our children’s heights as they grew. We had to leave it behind when we moved because it was part of the house. But when the new owners renovated, they took it out and our friends were able to get it and drove it out to us on a visit. The memories!
We do not have this many children!
That inspired an idea to carve a growth chart for our grandchildren. I decided to keep it simple so that there would be lots of room for names. I chose a 6” wide maple board. Because our family is fairly tall (both of my sons are over 6 feet) I made the board 7 feet long.
The tools I used
I marked it every half inch, every inch and every foot. The half inch marks are half inch in length. The one inch marks are one inch long and the one foot marks are two inches long.
As you can see, I also carved the family name. I did not paint or varnish the board so that it would be easier to write on it.
If you want one like this for your family, please contact me by email at gvmcmillan@gmail.com Because wood prices are so volatile right now I can’t set a standard price, but we can make arrangements in advance so that you can order with confidence.